Outdoor Aviary Project
..the aviary I always wanted to build
by Myra
Articles and Information - Lady Gouldian Finch
Ever since my parents gave me that first pair of finches I've dreamed of a large walk-in aviary where my beloved finches could fly about in open spaces and behave more naturally than they do in a cage. Cages worked well for me for years but feeding and cleaning time always seemed too stressful for the finches. Plus as everyone knows, if you breed finches in cages, you must continue to buy more and more cages to accommodate the ever-growing population.
Many years ago I did Build a walk-in aviary but living in Iowa prevented me from keeping the aviary outdoors any time of year. Therefore it was a simple walk in flight cage. That first aviary was wonderful and allowed me to become part of the finches' environment much more than I could while they were in smaller cages.
Then in the fall of 2004 I moved to Arizona and realized I could finally build the type of aviary I had always wanted. From the moment I moved in and saw my new backyard, I knew exactly how I wanted the aviary built. Of course, as I had just moved half way across the country, who could afford such an addition? I settled for screening in my covered patio and placing my flight cages on the patio during the winter and spring months.
Ok down to basics.
 Myra Markley (FinchNiche) photo of Outdoor Aviary Project
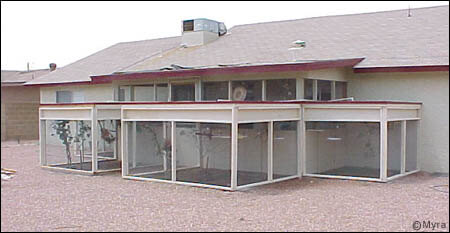
Building an outdoor aviary in Arizona isn't as simple as putting together some walls and stretching a wire mesh across it. In fact that simple plan almost never works. I had to consider scorching heat, cold (but not freezing) winters, sand storms, heavy rain, strong winds, insects, and animals. The finches needed protection from all of this at various times of the year without being totally shut out of the world. No small task, but not impossible either. To make things a tad more complicated my patio wasn't designed symmetrically so none of the aviaries would be the exact same dimensions.
Aviary A: 6'L x 7'10"W x 5'4"H. Wire mesh is ½".
Aviary B: 9' 7 ½"L x 8'W x 5'4"H. Wire mesh is ½".
Aviary C: 7' 6"L x 8'W x 5'4"H. Wire mesh is ½".
Aviary D: 6'L x 7' 9 ?"W x 5'4"H. Wire mesh is ¼".
Aviary D was given a smaller wire mesh because it was designed to house waxbills and other tiny finch species.
 Myra Markley (FinchNiche) photo of Outdoor Aviary Project
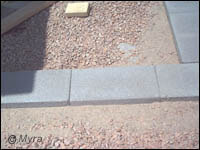
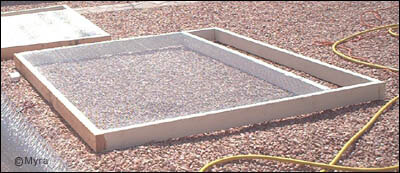
Each aviary's foundation is made of brick and packed with sand to strengthen and level it.
 Myra Markley (FinchNiche) photo of Outdoor Aviary Project
As one member of the crew was laying the foundation, another was hammering together each panel that would become the walls for each aviary.
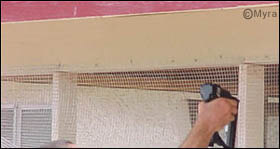
Each piece of wood used on this project was painted to not only match the color of my home but also to make the aviary more weather resistant.
Next roll after roll of galvanized wire was stretched across the inside of each panel. The open slat you see in the photos is where plywood was nailed on.
 Myra Markley (FinchNiche) photo of Outdoor Aviary Project
 Myra Markley (FinchNiche) photo of Outdoor Aviary Project
This was done to serve as a windbreak and overall protection from the elements. During storms most of the finches retreat to the top of the aviaries for shelter. Once the walls were in place, nailed together and securely attached to my patio work on the roofs started.
The roofs were framed out, covered with plywood then lifted in to place for a snug fit before being nailed down.
 Myra Markley (FinchNiche) photo of Outdoor Aviary Project
Then each roof was covered with tarpaper and rolled on shingling to match the roof of the house.
As the aviaries went up so did the 'catch'. My entire patio was turned into the catch area. To do this additional wire had to go up in the gaps from the top of each aviary to the roof of the patio.
 Myra Markley (FinchNiche) photo of Outdoor Aviary Project
Granted the catch is unusually large but for this project it was simply easier to build off of the existing patio rather than to try to work within it or to expand the patio itself outwards.
 Myra Markley (FinchNiche) photo of Outdoor Aviary Project
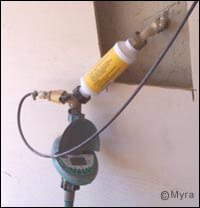
Once the major construction was finished work began on the plumbing. Due to a slight change plans half way through the build process, the faucet and everything attached will eventually be moved in to the catch area. Because this is something I'm doing after the fact the area around the existing faucet was left unfinished intentionally.
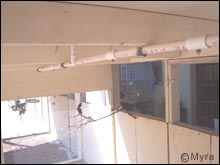
The misters were installed right along side the drippers. Both run off the same faucet that uses a splitter to keep the systems separate. A timer was installed on the mister line so I won't need to turn them on and off each day. As the seasons change, I can adjust the timer as needed and this winter I can shut it off entirely. The tubing for the drippers and the piping (all PVC) for the misters run from aviary to aviary across the roofs and down in to each aviary.
 Myra Markley (FinchNiche) photo of Outdoor Aviary Project
The first drippers that were put in didn't work as well as hoped. They would clog due to the hard water. So a filter was added to the entire system and adjustable dripper heads were put on. The majority of the time they are kept at a simple drip but when necessary they can be opened up to full flow to help keep the heads clean and push air out of the line.
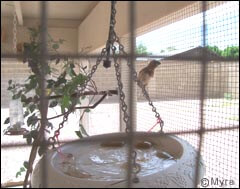
The drippers come straight in and drip into a dish that hangs from the roof. The dish allows about ½" of water to collect before it spills on to the ground. To clean the dishes I only need to tip them and dump the soiled water then let the drippers refill the dish. In the photo you will also see river rocks in the dish. This adds weight to keep them from flailing about in high winds and to give the finches something to stand on when they jump in for a bath.
 Myra Markley (FinchNiche) photo of Outdoor Aviary Project
The misters come in slightly towards the front and in the center of each aviary. From there the tube forms a T and runs most of the length of each aviary. The misters were kept towards the front to keep the nests (hung along the back wall) from getting wet. A few perches and stands are kept under the misters so the finches can cool down quickly or take a bath in the spray. Each aviary has four misting heads except for aviary B (the largest), which has five.
Like the drippers, clogging mister heads were a slight problem before the filter was installed but now it isn't even an issue.
 Myra Markley (FinchNiche) photo of Outdoor Aviary Project
Food is dispensed from hanging 1 liter jars. Most of them will last a week or so unless the birds are feeding young. On the occasions it does get windy they will spill a bit but the finches have no problem picking the seeds up from the ground. In fact any missed seeds often sprout if they land near the misters. These little mishaps have eliminated my need to sprout seed. The finches are now sprouting their own seeds and eating the greens.
Various branches, plastic plants, wooden stands and other miscellaneous items were added to each aviary to enrich the finches' environment. In time more will be added to all of them.
For the time being they seem quite content.
The final touch added a red trim that runs the length of the aviary on the inside of the catch and the outside of each aviary. The trim is painted to match the trim on my house which helps make the aviary look like it is a part of my home.
 Myra Markley (FinchNiche) photo of Outdoor Aviary Project
Now for a few fun photos |
 Myra Markley (FinchNiche) photo of finch collection
Photos of the aviary Myra Markley (FinchNiche) photo of finch collection
Photos of the aviary |
 Myra Markley (FinchNiche) photo of finch collection Myra Markley (FinchNiche) photo of finch collection
 Myra Markley (FinchNiche) photo of her finch collection Myra Markley (FinchNiche) photo of her finch collection
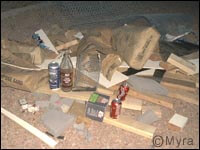
Just to prove that the guys worked hard I snapped a photo of the trash pile one evening after they left. In case you are curious, yes, they did clean everything up when the project was finished.
 Myra Markley (FinchNiche) photo of Outdoor Aviary Project Myra Markley (FinchNiche) photo of Outdoor Aviary Project
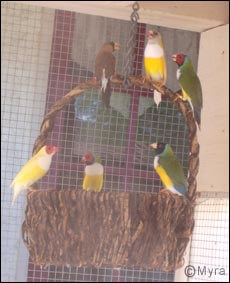
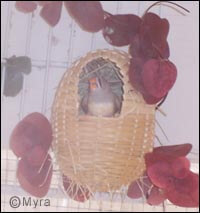
The hanging wicker basket in my Gouldian aviary is a favorite perching place for the finches. It hangs near the mister heads so it stays cool without becoming soaking wet in the process. I often put nesting materials in the basket to give them something to play with and to line their nests with. |
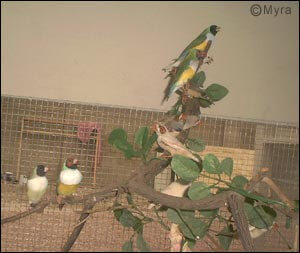
A nice shot of my finches just hanging out. This aviary (aviary A) was the first to be finished so I moved all of the finches into it before I had the others set-up with perches and feeders. This allowed the finches to get used to the new environment before being moved to the bigger aviaries and split up according to species. |
My society & Grassfinch were kept with the Gouldians. Eventually, a few more Gouldians were added as were a pair of Diamond Doves. |
 Myra Markley (FinchNiche) photo of female zebra in nest Myra Markley (FinchNiche) photo of female zebra in nest
The Zebra finches were split into two aviaries. One holds the normal greys and other pure color mutations; the other holds all the pied zebras. This is done to prevent the pied mutation from getting in to my pure mutation bloodlines. You know how zebras are: have nest; will make babies. |
 Myra Markley (FinchNiche) photo of Outdoor Aviary Project Myra Markley (FinchNiche) photo of Outdoor Aviary Project
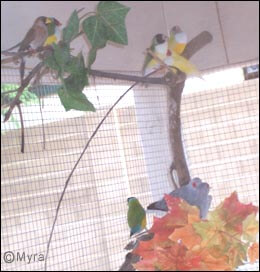
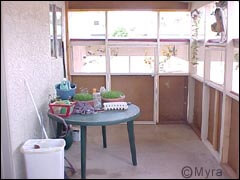
This shows the aviary from inside the catch/patio. You can see the doors for aviary A & B here along with my very messy patio table. The tiny window you see is over my kitchen sink so I can watch my finches while cooking or doing the dishes. It's so relaxing. |